In this blog post, we’ll walk through the process of setting up EC2 instances in AWS, configuring VPCs, subnets, internet gateways, and routing tables, and exploring key networking concepts such as public/private subnets, security groups, and jump servers. We’ll cover practical steps and real-life use cases.
1. Setting Up EC2 Instances and Networking
To start, we need to launch EC2 instances and configure their network settings. Let’s break this down:
Step-by-step process:
- Create Subnets:
- You need to create four subnets within your VPC:
- Public Subnet 1
- Private Subnet 1
- Public Subnet 2
- Private Subnet 2
- Launch EC2 Instance:
- Go to EC2 Dashboard in AWS Console and click Launch Instance.
- Choose your desired AMI (e.g., Ubuntu).
- In Network Settings, select your created VPC and ensure you enable Auto-assign Public IP.
- Choose an existing security group, preferably the default security group for simplicity.
- Launch the instance.
- Connecting to the Instance:
- After launching the instance, you may face issues connecting to the EC2 instance despite it having a public IP. Why?This happens because you haven’t set up internet access yet. The instance is inside a public subnet, but it cannot access the internet without the proper configurations.
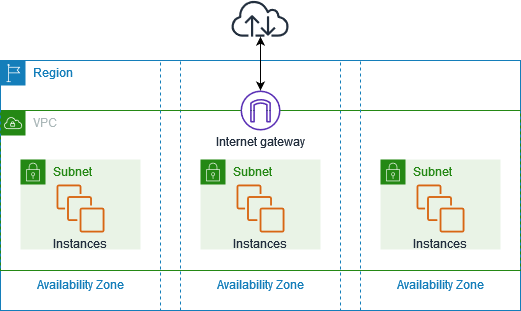
2. Attaching an Internet Gateway to Enable Internet Access
For EC2 instances in a Public Subnet, we need to provide internet access by attaching an Internet Gateway (IGW) to our VPC.
Steps:
- Create an Internet Gateway:
- In the VPC Dashboard, go to Internet Gateways and click Create Internet Gateway.
- After creation, go to Actions and choose Attach to VPC.
- Select the VPC where your EC2 instance resides.
- Modify the Route Table:
- The default route table does not have a route to the Internet Gateway. You need to edit it:
- Go to Route Tables in the VPC dashboard.
- Select your default route table and click Edit Routes.
- Add a new route with Destination: 0.0.0.0/0 and Target: Internet Gateway.
- Once this is done, your EC2 instance should now be able to communicate with the internet.
3. Public vs. Private Subnets: Real-life Use Cases
- Public Subnets are used for resources that need direct internet access, such as web servers, load balancers, and bastion hosts.
- Private Subnets are used for databases, internal services, and other resources that should not have direct internet access.
4. Connecting EC2 Instances via Ping (Private to Public)
To test communication between instances, you can use ping.
Steps to test ping:
- Launch two instances:
- Instance 1: Public subnet (with internet access).
- Instance 2: Private subnet (without internet access).
- Security Group Configuration:
- For both instances, modify the security groups to allow ICMP (ping).
- Go to the security group settings and add an inbound rule for ICMP IPv4.
- Ping from Instance 1 to Instance 2:
- SSH into Instance 1 (public subnet).
- Ping Instance 2 using its private IP.
- If configured correctly, the instances should be able to communicate.
5. Configuring Private Subnet Internet Access Using a NAT Gateway
Instances in Private Subnets typically don’t have direct internet access. To allow private instances to access the internet (for example, for updates or installing packages), we use a NAT Gateway.
Steps to Configure NAT Gateway:
- Create NAT Gateway:
- Go to the VPC Dashboard, and under NAT Gateways, create a new NAT Gateway in your public subnet.
- Allocate an Elastic IP for the NAT Gateway.
- Update Route Tables:
- For private subnets, update the route table to route traffic to the NAT Gateway for internet-bound traffic.
- For public subnets, ensure the route table routes traffic to the Internet Gateway.
6. Setting Up a Jump Server (Bastion Host)
A Jump Server (also known as a Bastion Host) is a special-purpose instance that allows SSH access to instances in a private subnet. It's commonly used when you want to access a private subnet but don’t want to expose the instances directly to the internet.
Steps to Set Up a Jump Server:
- Launch the Public EC2 Instance:
- This will act as your Jump Server.
- SSH into the public EC2 instance using the key pair associated with it.
- Create Private Key for Private EC2 Instance:
- On the jump server, create a new private key that will be used to access the private instance:
- Run the command
vi my_private_key.pemand press i to start editing. - Paste the private key content for the private instance.
- Press ESC and then type
:wqto save and exit. - Set the correct permissions with
chmod 400 my_private_key.pem.
- SSH into Private Instance:
- From the jump server, SSH into the private instance using the private key:
ssh -i my_private_key.pem ubuntu@<Private-Instance-IP>- Note: Since the private instance does not have internet access, it can only be accessed through the jump server.
7. Securing EC2 Instances with Security Groups
When creating EC2 instances, always pay attention to Security Groups:
- Security Groups act as firewalls that control inbound and outbound traffic to EC2 instances.
- You can specify rules for protocols (e.g., SSH, HTTP), ports (e.g., 22 for SSH), and IP addresses (e.g., only allow specific IPs to connect).
For EC2 instances in a private subnet:
- Add Inbound Rules to allow ICMP for ping.
- Ensure SSH access is restricted to trusted IPs or security groups.
Conclusion
We’ve walked through setting up EC2 instances in both public and private subnets within a VPC. By attaching an Internet Gateway and configuring the Route Table, we've enabled internet access for EC2 instances in the public subnet and allowed private instances to access the internet using a NAT Gateway.
Moreover, we’ve explored real-life use cases for public and private subnets, the need for jump servers to access private instances, and the importance of security groups in controlling network traffic.
By following these steps and understanding these concepts, you can efficiently manage and secure your AWS infrastructure in a VPC, ensuring reliable, scalable, and secure deployments.
Understanding AWS Networking and EC2 Instances
Creating Subnets and Instances
1. Subnet Creation:
- Navigate to the VPC dashboard in AWS Console.
- Create 4 subnets within your VPC, ensuring they have different CIDR blocks but belong to the same VPC.
2. Launching an EC2 Instance:
- Choose your AMI, instance type, and proceed to the network settings.
- Network Settings:VPC: Select the VPC where your subnets reside.
- Auto-assign Public IP: Enable this if you want the instance to have a public IP.
- Security Group: Choose an existing one or create a new one. For simplicity, choose the default security group which might allow all inbound traffic from within the VPC but be cautious in production environments.
3. Connection Issues:
- After launching, you might not connect if:No Internet Gateway (IGW) is attached to your VPC.
- The route table does not direct traffic to the IGW for internet access.
Configuring Internet Access
4. Internet Gateway (IGW):
- Create an IGW from the VPC dashboard.
- Attach it to your VPC.
5. Route Tables:
- What is a Route Table? It's like a map for network traffic, telling it where to go.Destination: An IP address range or a single IP where traffic is headed.
- Target: Where that traffic should be sent (like an IGW for internet access).
- Edit Route Table:Select your route table, add or modify routes so the destination "0.0.0.0/0" points to your IGW. This ensures all internet-bound traffic uses the gateway.
Subnets in Real Life
- Public Subnet: Directly accessible from the internet, suitable for web servers or load balancers.
- Private Subnet: Not directly internet-accessible, ideal for databases or backend services where security is paramount.
Use Cases:
- Public Subnet: Use for instances that need to serve web traffic or for bastion hosts (jump servers).
- Private Subnet: For backend services like databases or application servers that should not be directly internet-facing.
Connecting Instances
- Ping Between Instances: Ensure both instances have ICMP rules in their security groups for ping to work.
- Use the private IP for communication within the VPC.
Accessing Private Subnets
- Jump Server (Bastion Host):Setup:Create a key pair for your public instance, use it to SSH into this instance.
- From this public instance, create another key for your private instance.
- SSH into Private Instance:SSH into your public (bastion) instance first.
- Then, from there, SSH into your private instance using its private IP and the new key:
ssh -i "my_private_key.pem" ubuntu@1<ip>
- Internet Access for Private Instances:Use a NAT Gateway or instance in a public subnet for outbound internet access. This allows updates or software installations without direct internet exposure.
Security Group Considerations
- When creating or selecting security groups, ensure they are associated with the correct VPC, as security groups are VPC-specific.
Final Note:
- Always manage security keys with care; use chmod 400 to restrict permissions to read-only for the owner to enhance security.
By understanding these concepts, you can effectively manage network configurations in AWS to secure and optimize your cloud infrastructure.