The Document Object Model (DOM) is a fundamental concept in web development that allows developers to interact with and manipulate web pages dynamically. In this blog, we’ll explore the DOM, its structure, and how to use it to create interactive and dynamic web applications. We’ll also provide simple code examples to help you understand each concept.
1. Introduction to DOM
What is DOM?
- DOM stands for Document Object Model.
- It is a programming interface for web documents (HTML or XML).
- The DOM represents the structure of a web page as a tree-like structure, where each element, attribute, and text content is a node.
Why is DOM Important?
- Dynamic Web Interaction: DOM allows developers to modify web page content and structure without reloading the page.
- Cross-Browser Compatibility: DOM provides a standardized way to interact with web documents across different browsers.
- Accessibility: DOM can enhance web accessibility by enabling screen readers to interact with web content.
- Data Binding: DOM facilitates two-way data binding between HTML elements and JavaScript.
- Web Application Development: Modern web apps rely heavily on DOM manipulation for creating rich, interactive user interfaces.
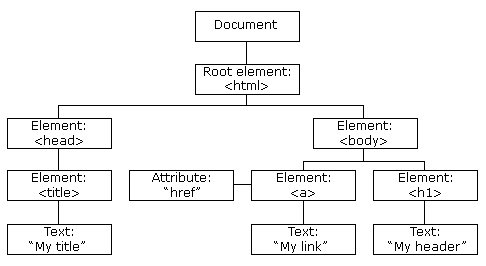
2. DOM Tree Structure
The DOM tree is a hierarchical representation of an HTML document. Here’s an example of a simple DOM tree:
document
├── html
│   ├── head
│   │   └── title
│   └── body
│       ├── p
│       └── ul
│           ├── li
│           └── li
Run HTML
Key Elements of the DOM Tree
- Document Node: The root of the DOM tree.
- Element Nodes: Represent HTML elements (e.g.,
<div>,<p>). - Attribute Nodes: Represent attributes of elements (e.g.,
id,class). - Text Nodes: Represent text content within elements.
- Comment Nodes: Represent comments in the document.
- Whitespace Nodes: Represent spaces, tabs, or line breaks.
3. Basics of DOM
HTML Elements as Nodes
In the DOM, every part of an HTML document is a node. Nodes can be elements, attributes, text, or comments.
Accessing the DOM in Browsers
You can access the DOM using JavaScript. The document object is the entry point to the DOM tree.
// Access an element by its ID
const element = document.getElementById('myElement');
4. Accessing DOM Elements
Methods to Access DOM Elements
getElementById(): Selects an element by its ID.
const element = document.getElementById('myDiv');
getElementsByClassName(): Selects elements by their class name.
const elements = document.getElementsByClassName('para');
getElementsByTagName(): Selects elements by their tag name.- javascript
- Copy
const listItems = document.getElementsByTagName('li');
querySelector()andquerySelectorAll(): Select elements using CSS selectors.
const firstButton = document.querySelector('.btn');
const allParagraphs = document.querySelectorAll('p.text');
5. Traversing the DOM
Parent, Child, and Sibling Nodes
- Parent Node: The node directly above another node.
- Child Node: The node directly below another node.
- Sibling Nodes: Nodes that share the same parent.
DOM Traversal Methods
parentNode: Gets the parent node.
const parentDiv = paragraph.parentNode;
childNodes: Retrieves all child nodes.
const children = div.childNodes;
firstChildandlastChild: Access the first and last child nodes.
const firstChild = div.firstChild;
const lastChild = div.lastChild;
nextSiblingandpreviousSibling: Access the next and previous sibling nodes.
const nextElement = paragraph.nextSibling;
const previousElement = paragraph.previousSibling;
6. Modifying DOM Elements
Changing Text Content
You can change the text content of an element using the textContent property.
const heading = document.getElementById('myHeading');
heading.textContent = 'New Heading Text';
Modifying Attributes
Use setAttribute and getAttribute to modify element attributes.
const img = document.querySelector('img');
img.setAttribute('src', 'new-image.jpg');
const altText = img.getAttribute('alt');
Adding and Removing Elements
createElement: Creates a new element.appendChild: Adds a new element to the DOM.removeChild: Removes an element from the DOM.
const newParagraph = document.createElement('p');
newParagraph.textContent = 'This is a new paragraph.';
const contentDiv = document.getElementById('content');
contentDiv.appendChild(newParagraph);
7. Styling with the DOM
Changing CSS Properties
You can change CSS properties using the style property.
const myElement = document.getElementById('my-element');
myElement.style.backgroundColor = 'blue';
Adding and Removing CSS Classes
Use classList.add and classList.remove to add or remove CSS classes.
myElement.classList.add('highlight');
myElement.classList.remove('inactive');
8. DOM Events
Event Listeners
Event listeners allow you to respond to user actions like clicks, mouse movements, or key presses.
const button = document.getElementById('myButton');
button.addEventListener('click', function () {
  alert('Button Clicked!');
});
Event Object
The event object contains information about the event, such as the type and target element.
button.addEventListener('click', function (event) {
  console.log('Event type: ' + event.type);
  console.log('Target element: ' + event.target);
});
9. Advanced DOM Manipulation
Creating Elements Dynamically
You can create and insert elements dynamically.
const newParagraph = document.createElement('p');
newParagraph.textContent = 'This is a dynamically created paragraph.';
document.body.appendChild(newParagraph);
Handling Form Data
You can access and manipulate form data using JavaScript.
const form = document.getElementById('myForm');
form.addEventListener('submit', function (event) {
  event.preventDefault();
  const formData = new FormData(form);
  const username = formData.get('username');
  const password = formData.get('password');
  console.log('Username: ' + username + ', Password: ' + password);
});
Drag and Drop
You can implement drag-and-drop functionality using JavaScript.
const dragElement = document.getElementById('dragElement');
const dropTarget = document.getElementById('dropTarget');

dragElement.addEventListener('dragstart', function (event) {
  event.dataTransfer.setData('text/plain', 'Dragged text');
});

dropTarget.addEventListener('dragover', function (event) {
  event.preventDefault();
});

dropTarget.addEventListener('drop', function (event) {
  event.preventDefault();
  const droppedText = event.dataTransfer.getData('text/plain');
  dropTarget.textContent = 'Dropped: ' + droppedText;
});
Event Bubbling
Event bubbling is when an event starts from the target element and propagates upward to its parent elements.
Example:
<div id="parent" style="padding: 20px; background-color: lightblue;">
       Parent
<button id="child">Click Me</button>
</div>
<script>
document.getElementById('parent').addEventListener('click', () => {
console.log('Parent clicked'); });
document.getElementById('child').addEventListener('click', () => {
console.log('Child clicked'); });
</script>
Output when clicking on the button:
Child clicked
Parent clicked
- Why?: The event on the button (
#child) bubbles up to its parent (#parent).
2. Event Propagation (Phases)
Event propagation occurs in three phases:
- Capturing Phase: The event goes from the root to the target element.
- Target Phase: The event triggers on the target element.
- Bubbling Phase: The event bubbles back up to the root.
Example:
<div id="outer" style="padding: 30px; background-color: lightcoral;">

 Outer Div

 <div id="inner" style="padding: 20px; background-color: lightyellow;">

  Inner Div

 </div>

</div>


<script>

 document.getElementById('outer').addEventListener(

  'click',

  () => {

   console.log('Outer (Capturing)');

  },

  true // Capture phase

 );


 document.getElementById('inner').addEventListener('click', () => {

  console.log('Inner (Target)');

 });


 document.getElementById('outer').addEventListener('click', () => {

  console.log('Outer (Bubbling)');

 });

</script>
Output when clicking on the #inner div:
Outer (Capturing) Inner (Target) Outer (Bubbling)
- Why?: The event propagates from the outermost element to the target during capturing, triggers the target, and then bubbles up.
3. Event Delegation
Event delegation allows you to attach a single event listener to a parent element, which listens for events on its child elements using event propagation.
Example:
<ul id="list" style="background-color: lightgreen; padding: 10px;">
<li>Item 1</li>
<li>Item 2</li>
<li>Item 3</li>
</ul>
 <script> document.getElementById('list').addEventListener('click', (event) => {
if (event.target.tagName === 'LI') {
console.log(`You clicked on ${event.target.textContent}`); }
});
 </script>
Output when clicking on Item 2:
You clicked on Item 2
- Why Use Delegation?:
- Efficient for dynamic content (e.g., adding/removing items dynamically).
- Avoids adding event listeners to individual child elements.
Key Differences
ConceptDescriptionExample Use CaseEvent BubblingEvent propagates upward from the target to its ancestors.Stop propagation at a level.Event CapturingEvent propagates downward from ancestors to the target.Custom capturing behavior.Event DelegationUse a single parent listener to handle events for children.Handling dynamic lists.Summary:
- Event Bubbling: Child → Parent (default behavior).
- Event Propagation: Capturing → Target → Bubbling phases.
- Event Delegation: Add a listener to the parent and use it to handle child events.