Amazon Machine Images (AMIs) are essential components in AWS, providing a blueprint to launch EC2 instances with a pre-configured environment. An AMI includes the operating system, application code, runtime, and any additional configurations.
What is an AMI?
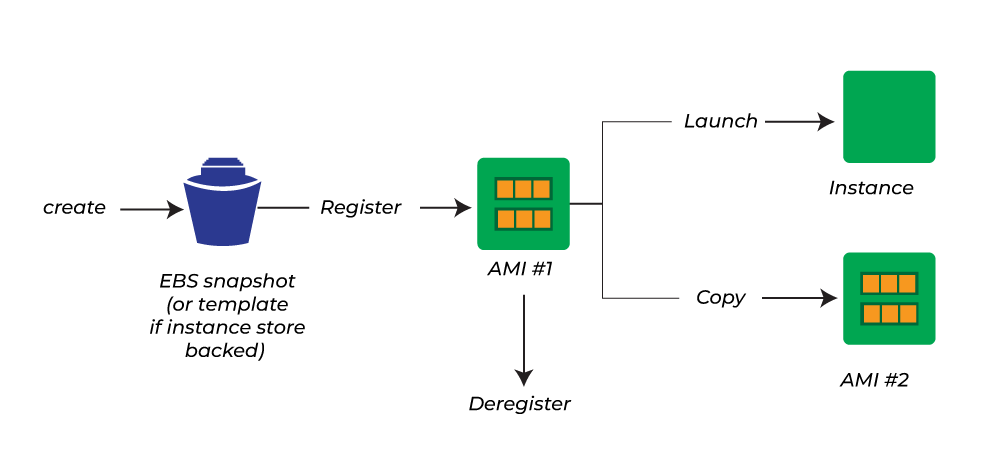
An AMI is a template for creating an instance in AWS. It acts as a snapshot of your configured environment, allowing you to replicate and deploy it quickly.
Benefits of Using AMIs
- Quick Deployment: Launch multiple instances with the same configuration.
- Custom Environment: Pre-install applications or configurations tailored to your needs.
- Backup & Recovery: Serve as a backup for your EC2 instance.
- Sharing Across Accounts: Share with other AWS accounts or make it publicly accessible.
- Cross-Region Copy: Easily replicate configurations across AWS regions.
How to Create an AMI
Method 1: From an EC2 Instance
- Prepare Your Instance:
- Launch an EC2 instance.
- Configure it (e.g., install Nginx and create a custom page):
sudo apt update
sudo apt install nginx -y
echo "Welcome from the original instance" | sudo tee /var/www/html/index.html > /dev/null
- Verify by accessing the instance's public IP.
- Create an AMI:
- Go to the EC2 Dashboard.
- Select the instance.
- From the Actions menu, choose Image and templates > Create Image.
- Provide a name and description, and click Create Image.
- Confirm AMI Creation:
- Go to Images > AMIs in the EC2 Dashboard.
- The newly created AMI will appear in the list once ready.
Method 2: From a Snapshot
- Create a Snapshot:
- Go to Elastic Block Store > Volumes.
- Select the volume attached to your instance.
- Choose Create Snapshot from the Actions menu.
- Create an AMI:
- Go to Elastic Block Store > Snapshots.
- Select the created snapshot.
- From the Actions menu, choose Create Image.
- Provide a name and description, and click Create Image.
Test the AMI
- Launch an Instance from the AMI:
- Go to Images > AMIs.
- Select your AMI and click Launch Instance.
- Choose an instance type, configure settings, and launch.
- Verify the Configuration:
- Access the new instance using its public IP.
- You should see the same content (e.g., the Nginx page) as the original instance.
How to Delete an AMI
- Go to Images > AMIs.
- Select the AMI to delete.
- From the Actions menu, choose Deregister AMI.
- If a snapshot is associated, go to Elastic Block Store > Snapshots and delete the snapshot.
How to Share an AMI
- Go to Images > AMIs.
- Select the AMI.
- From the Actions menu, choose Modify Image Permissions.
- Add the AWS account ID with which you want to share.
- Save changes.
Copying an AMI to Another Region
- Go to Images > AMIs.
- Select the AMI.
- From the Actions menu, choose Copy AMI.
- Choose the destination region and initiate the copy.
Public and Private AMIs
- Private AMI: Only accessible to the AWS account that created it.
- Public AMI: Accessible to all AWS accounts globally.
- Modify the AMI permissions to make it public.
Key Points
- Creating an AMI automatically creates a snapshot of the instance's root volume.
- You can launch as many instances as needed from a single AMI.
- AMIs ensure consistency in deployments across different environments.
- Nginx or any installed software and data on the original instance will persist in instances launched from the AMI.
Conclusion
AMIs are powerful tools in AWS for creating reusable templates for instances. They save time, ensure consistency, and offer flexibility in managing your environments across accounts and regions. Mastering AMIs is a critical skill for efficiently managing EC2 instances and infrastructure.