What is an Application Load Balancer (ALB)?
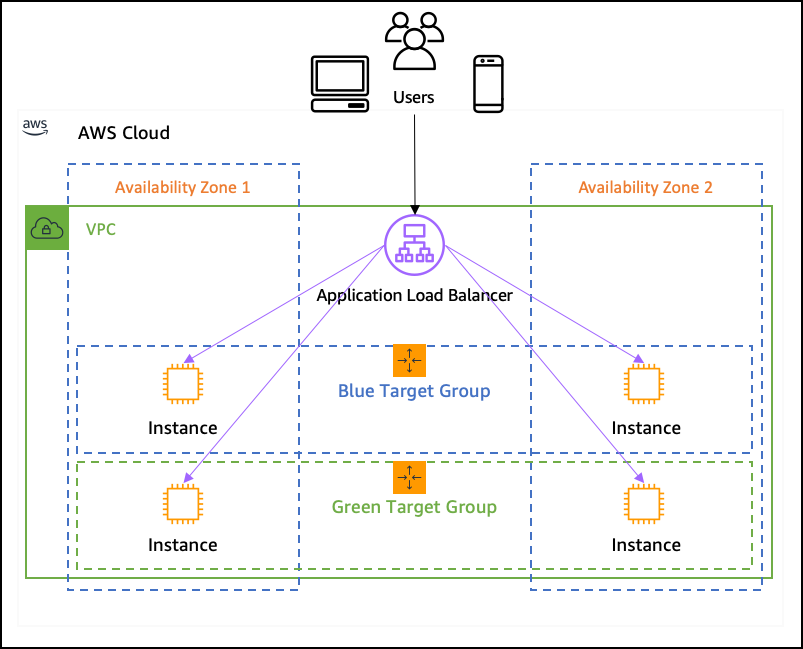
An Application Load Balancer (ALB) is a service provided by AWS to distribute incoming application traffic across multiple targets, such as EC2 instances, containers, and IP addresses. Unlike the Classic Load Balancer (CLB), ALB is designed to route traffic based on application-level information like HTTP request headers, URL paths, etc.
ALB operates at the application layer (Layer 7 of the OSI model) and supports advanced routing, allowing more flexibility in traffic distribution. For example, you can route traffic based on URL paths or host headers.
Why Do We Need ALB?
ALB is an essential tool for scalability and availability in web applications. Some of the key reasons to use an ALB include:
- Distribute Traffic Efficiently: Spread traffic across multiple EC2 instances to prevent overloading a single server.
- Path-based Routing: Direct traffic to specific services based on URL path or host header, making it ideal for microservices architecture.
- SSL Termination: ALB can offload the SSL/TLS handshake process, freeing up resources on backend servers.
- Health Checks: Monitor the health of your EC2 instances and automatically remove unhealthy instances from the load balancer pool.
- Cost Efficiency: ELB (including ALB) scales automatically to handle fluctuating traffic loads without manual intervention.
Benefits of Using ALB
- Improved Fault Tolerance: By distributing traffic across multiple instances, ALB helps in ensuring high availability.
- Automatic Scaling: ALB adjusts automatically based on the amount of incoming traffic, which helps in maintaining the performance of your application.
- Security: Integration with AWS WAF (Web Application Firewall) to protect your application from common threats.
How to Test ALB
To test an ALB, follow these steps:
Step 1: Launch EC2 Instances
- Launch 2-3 EC2 instances. These instances will serve as your backend for the ALB.
- Configure them with some basic user data (e.g., write a small web app or static HTML content).
For testing purposes, you can add simple content like:
#!/bin/bash
echo "Hello from instance $(hostname)" > /var/www/html/index.html
This will show different text based on the instance when you access the ALB.
Step 2: Create a Target Group
- Go to the EC2 dashboard and select Target Groups from the left menu.
- Click Create target group, choose the protocol (HTTP), and port (80).
- Select Instance as the target type.
- Register the EC2 instances you created earlier as targets in this target group.
Step 3: Configure Security Groups
- Ensure the security group for your instances allows traffic on port 80 (HTTP).
- Attach the security group to the EC2 instances to allow inbound traffic.
Step 4: Create the ALB
- Go to the Load Balancers section in EC2 and click Create Load Balancer.
- Choose Application Load Balancer.
- Assign it a name and select internet-facing if you want it to be publicly accessible.
- Choose the appropriate VPC and subnets.
- Under Listeners, configure an HTTP listener on port 80.
Step 5: Attach Target Group to Load Balancer
- In the Listener section of the Load Balancer, select the target group you created earlier.
- Review the settings and create the Load Balancer.
Step 6: Test the ALB
- After the ALB is successfully created, go to the DNS name of the ALB.
- Open the browser and navigate to
http://<your-alb-dns-name>. - You should see the output from the backend instances. If everything is set up correctly, you should see the message that identifies which instance is serving the request.
When you refresh the page, the content may change (e.g., you may see different instance names or different text). This means the traffic is being balanced correctly between the instances by the ALB.
Route-based Load Balancing
A Route-based Load Balancer routes traffic to different target groups based on the path or domain of the incoming request. This is useful in scenarios where you have different services running (e.g., /api routes to one set of instances, and /admin routes to another set).
How to Test Route-based Load Balancing
To test route-based load balancing, you can follow these steps:
Step 1: Create EC2 Instances
Launch EC2 instances and configure them with different content for different paths.
For instance, set up one instance with content at /user:
#!/bin/bash
echo "User page" > /var/www/html/index.html
And another with content at /admin:
#!/bin/bash
echo "Admin page" > /var/www/html/index.html
Step 2: Set Up Target Groups
Create two target groups for these services, one for /user and another for /admin.
Step 3: Create a Load Balancer
Create a new Application Load Balancer.
Under Listeners, add routing rules based on the request path:
- If the path is
/user, forward the request to the /user target group. - If the path is
/admin, forward the request to the /admin target group.
Step 4: Test
Once the ALB is created with the path-based rules, test it by navigating to the following URLs:
http://<alb-dns-name>/user- Should route to the /user target group and display the "User page" content.http://<alb-dns-name>/admin- Should route to the /admin target group and display the "Admin page" content.
Conclusion
In conclusion, the Application Load Balancer (ALB) is a powerful and flexible tool that helps distribute application traffic efficiently, provides scalability, and improves fault tolerance. By using path-based routing and properly configuring target groups, you can achieve granular control over how requests are routed to various services.
Script for User Data Example:
#!/bin/bash
sudo yum update -y
sudo yum install -y nginx
sudo systemctl start nginx
sudo systemctl enable nginx
mkdir /var/www/html/user
echo "Welcome to the User page served by $(hostname)" > /var/www/html/user/index.html
This script updates and installs Nginx, starts the service, and creates a directory for serving a simple HTML page when navigating to /user.
By following the above steps, you'll be able to set up and test a basic ALB configuration, providing high availability and load balancing for your web applications.