In the early days, stateful authentication was the norm: each user’s session data was stored on the server. While effective for small applications, this approach struggles to scale and can complicate infrastructure.
Drawbacks of Stateful Authentication
- Scalability Issues: Session storage demands memory, limiting user capacity and complicating horizontal scaling across multiple servers.
- Complex Load Balancing: Synchronizing sessions across servers for consistency adds latency and complexity.
- High Maintenance: Servers must handle session cleanup, expiry, and consistency, adding to the administrative load.
These challenges led to stateless authentication as a solution, commonly using JSON Web Tokens (JWTs). Here, no session data is stored on the server:
- JWTs are generated at login, signed, and sent to the client.
- Validation happens on every request via the token, removing server memory dependence.
Why Stateless Authentication Works Better
- Effortless Scaling: Since servers don’t store sessions, adding more servers is straightforward.
- Reduced Costs: With no session data, servers require less memory, supporting more users.
- Lower Maintenance: Stateless tokens manage their own expiration, reducing session-related tasks.
- Improved Security: Tokens can define user access scopes, ideal for single sign-on (SSO) and microservices.
Drawbacks of Stateless Authentication
- Token Revocation: Tokens aren’t easily invalidated until they expire.
- Token Size: JWTs can add bulk to requests.
- Short Expirations: Frequent expiration refreshes can complicate implementation.
Conclusion
Stateless authentication enables simpler, scalable infrastructure by shifting session data to the client, making it the preferred method for modern, cloud-based applications.
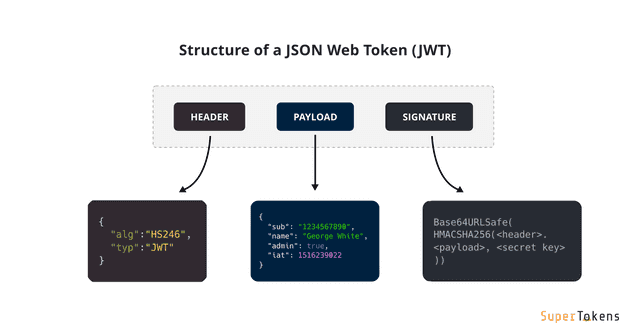
JSON Web Tokens (JWT) are a compact and self-contained way to represent information between parties. A JWT consists of three parts: the Header, the Payload, and the Signature. Each part is Base64Url encoded and separated by dots ('.'). Here's a breakdown of the structure and an example of a JWT:
JWT Structure
- Header
- Contains metadata about the token, typically including the type of token (JWT) and the signing algorithm used (e.g., HMAC SHA256 or RSA).
- Example:
{ "alg": "HS256", "typ": "JWT" }
- Payload
- Contains the claims or the information you want to transmit. Claims can include user data and any additional information relevant to the application.
- Example:
{ "sub": "1234567890", // Subject (usually the user ID)
"name": "John Doe",
"iat": 1516239022, // Issued at time
"exp": 1516242622 // Expiration time
}
- Signature
- To create the signature part, you take the encoded header, the encoded payload, a secret, and the algorithm specified in the header and sign it.
- Example using HMAC SHA256:
HMACSHA256( base64UrlEncode(header) + "." +
base64UrlEncode(payload),
secret)
Full JWT Example
Combining all three parts, a complete JWT might look like this (the parts are Base64Url encoded):
eyJhbGciOiAiSFMyNTYiLCAidHlwIjogIkpXVCJ9.
eyJzdWIiOiAiMTIzNDU2Nzg5MCIsICJuYW1lIjogIkpvaG4gRG9lIiwgImlhdCI6IDE1MTYyMzkwMjIsICJleHBfdGltZSI6IDE1MTYyMzkwMjJ9.
R5gFf0d2h1ZIz9gJgDbR5jFzNnBQwU4zExy9T7q8g4U
Explanation of the Example
- Header: Indicates that the token uses HMAC SHA256 as the signing algorithm and is a JWT.
- Payload: Contains information about the user (subject), the user's name, the issued time, and the expiration time of the token.
- Signature: The signature is used to verify that the sender of the JWT is who it says it is and to ensure that the message wasn’t changed along the way.
Using JWT
- Authentication: Once the user logs in, the server generates a JWT and sends it back to the client. The client then includes this token in the
Authorizationheader of subsequent requests. - Authorization: The server can validate the JWT to determine if the user has the necessary permissions to access specific resources.
Conclusion
JWT is a widely used method for secure information exchange. Understanding its structure helps in implementing and troubleshooting authentication and authorization systems effectively.
implementation of code step by step
Step 1: Set Up Authentication Routes

Step 2: Create Middleware to Protect Routes

Step 3: Protect Routes with Middleware
